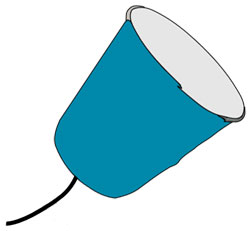
10 Dec 2012

Make a String Telephone


What you'll need:

2 paper cups
A sharp pencil or sewing needle to help poke holes
String (kite string and fishing lines work well)


Instructions:

Cut a long piece of string, you can experiment with different lengths but perhaps 20 metres (66 feet) is a good place to start.
Poke a small hole in the bottom of each cup.
Thread the string through each cup and tie knots at each end to stop it pulling through the cup (alternatively you can use a paper clip, washer or similar small object to hold the string in place).
Move into position with you and a friend holding the cups at a distance that makes the string tight (making sure the string isn't touching anything else).
One person talks into the cup while the other puts the cup to their ear and listens, can you hear each other?


What's happening?

Speaking into the cup creates sound waves which are converted into vibrations at the bottom of the cup. The vibrations travel along the string and are converted back into sound waves at the other end so your friend can hear what you said. Sound travels through the air but it travels even better through solids such as your cup and string, allowing you to hear sounds that might be too far away when traveling through the air.

More about phones:

Landline telephones feature microphones that convert sound waves into electric currents that are then sent through wires and converted back into sound waves by an earphone inside the telephone at the other end. Modern mobile phones use radio waves (part of the electromagnetic spectrum that includes microwaves, infrared, visible light, X-rays and others) to communicate with base stations located throughout telephone networks.

Phones have come a long way since Alexander Graham Bell was awarded the first electric telephone patent by the United States Patent and Trademark Office back in 1876. Today’s cell phones are a marvel of modern technology, featuring not only the ability to make phone calls but to also surf the web, play music, view documents and much more.

9 Dec 2012

Keeping Drinks Hot


What you'll need:

4 cups that are exactly the same
Hot water
Cold water
Cold milk
A thermometer
Spoons


Instructions:

Half fill each cup with hot water.
Check that all of the cups are at the same temperature. Leave the thermometer in one of the cups for now.
Add 1 spoon of milk to the first cup. Add 1 spoon of cold water to the second cup. Add 3 spoons of milk to the third cup. Don't add anything to the last cup.
Check the temperature of each cup every minute with the thermometer. Which cup of water stays hot for the longest.


What's happening?

This one's up to you, do you think you can you explain it?

Some other interesting questions related to this topic include:

What are some good ways of keeping drinks hot?
Have you heard of the word ‘insulation’?
What happens if you want to keep a drink cool rather than hot?
Which is more likely to keep a drink hot for longer: a tall thin cup or a wide shallow cup?
Do some liquids cool faster than others?
What type of cup is better for keeping drinks hot: paper, plastic, clay or glass?

8 Dec 2012

Can you protect a falling egg?


What you'll need:

Eggs
Paper towels
Build your egg protectors from resources such as:

Plastic straws
Popsicle sticks
Tape
Recycled paper
Glue
Plastic bags
Boxes
Used material
Plastic containers


The aim:

Your goal is simple, design and build a system that will protect an egg from a 1 metre (3.3 feet) drop. Eggs that smash or crack fail the test while eggs that survive without a scratch pass!


Getting started:

You need to create something that can absorb the energy the egg gathers as it accelerates towards the ground. A hard surface will crack the egg so you have to think carefully about how you can protect it. Something that will cushion the egg at the end of its fall is a good place to start, you want the egg to decelerate slowly so it doesn't crack or smash all over the ground. You'll need to run a few trials so have some eggs ready as guinea pigs, those that don’t survive will at least be comforted knowing they were smashed for a good cause, and if not, you can at least have scrambled eggs for dinner right?


7 Dec 2012

Make Your Own Microscope


What you'll need:

A piece of fuse wire
Some water
Objects to look at (newspaper or a magazine with fine print works well


Instructions:

Make a loop at the end of the fuse wire about 2mm wide.
Dip it into some water to get a drop formed in the loop.
Hold it close to your eye and look closely at an object such as a magazine.
You may have to experiment to get the right distance but you should see a magnified image, especially if you have the drop as close to your eye as possible.


What's happening?

Pioneers of early microscopes originally used tiny glass globes filled with water to magnify objects, this is similar to what you are doing in this experiment. The water droplet forms the shape of a convex lens, which refracts the light and converges it at the point where you see the image clearly. It was later that the method of grinding glass to make lenses was perfected. Modern microscopes have many lenses in them and allow us to see extremely small objects.


6 Dec 2012

Fossil Cast Project


What you'll need:

Plasticine
2 paper cups
An object that you would like to use as the fossilized impression
Plaster of paris
Water


Instructions:

Flatten a ball of plasticine until it is about 2 cm thick while making sure the top is smooth.
Put the plasticine inside a paper cup with the smooth side facing up. Carefully press the object you want to fossilize into the plasticine until it is partially buried.
Carefully remove the object from the plasticine. An impression of the object should be left behind.
Pour half a cup of plaster of paris into the other paper cup. Add a quarter cup of water to the plaster and stir until the mixture is smooth. Leave it for around two minutes.
When the mixture has thickened pour it on top of the plasticine in the other cup. Leave the mixture until the plaster has dried.
When the plaster has fully dried, tear away the sides of the paper cup and take out the plasticine and plaster. Keep it in a warm dry place and enjoy your very own fossil.


What's happening?

Fossils are extremely useful records of the past. In your case you left behind an impression of an object you own but fossils found by scientists around the world can date back to the time of dinosaurs. These fossils allow paleontologists (the name of scientists who study these types of fossils) to study what life might have been like millions of years ago. Fossils such as the one you made can leave delicate patterns and a surprising amount of detail.